Part 2: Using IMG2IMG in the Stable Diffusion Web UI
In Part 1 of this tutorial series, we reviewed the controls and work areas in the Txt2img section of Automatic1111’s Web UI. If you haven’t read that yet, I suggest you do so before moving onto this part. Now it’s time to examine the controls and parameters related to Img2img generation.
Technical Details
Just like the previous entry in this guide, I will be using Automatic1111’s Web UI running on my own computer. Furthermore, I’m running Stable Diffusion locally on a computer with the following specs:
- CPU: AMD Ryzen 5 3600
- RAM: 16GB
- GPU: NVIDIA GeForce RTX 3060 with 12GB of VRAM
Quick Note: All my example images in this guide were done at 512×512 pixels unless stated otherwise.
Img2img
The basis of latent diffusion image generation up to this point has been centered around the creation of images by using text descriptions alone. But now the real fun begins, because with Img2img features we can use a pre-existing picture to influence and control our AI-assisted creations!
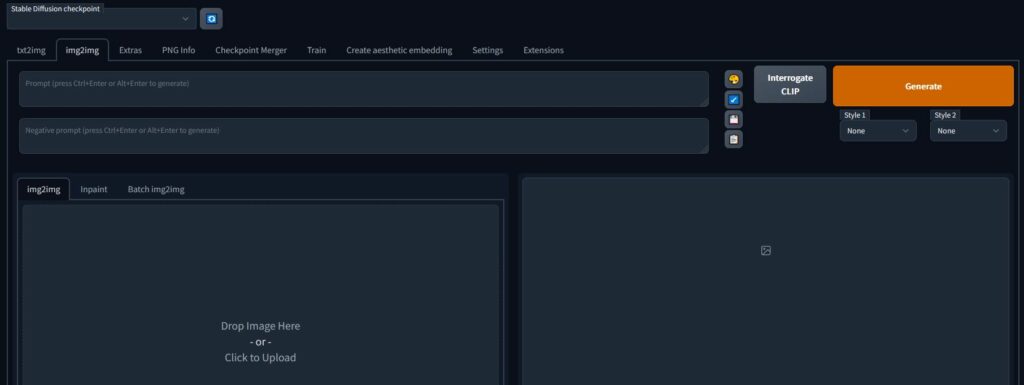
When you open the Web UI, you’ll see several tabs near the top; the second one says “img2img”. Let’s click on that and have a look around. As you peruse the Img2img work area, you’ll notice that most of the parameter controls from the Txt2img section are present: steps, methods, size, etc. But we do have a few new controls and features. We’ll inspect each one; they include:
- The Img2img Upload Window
- Interrogate CLIP
- Resizing
- Denoising Strength
Img2img Upload Window
On the left side of your screen, you will now see a second image window that says “Drop Image Here or Click to Upload”. This is where a source image can be loaded in, from which we can create countless variations or modifications. You still need to add a text prompt, and one that matches your source image at least vaguely. But what Stable Diffusion will do is look at the uploaded picture and make it’s own version of that visual including any additions you’ve mentioned in your prompt.
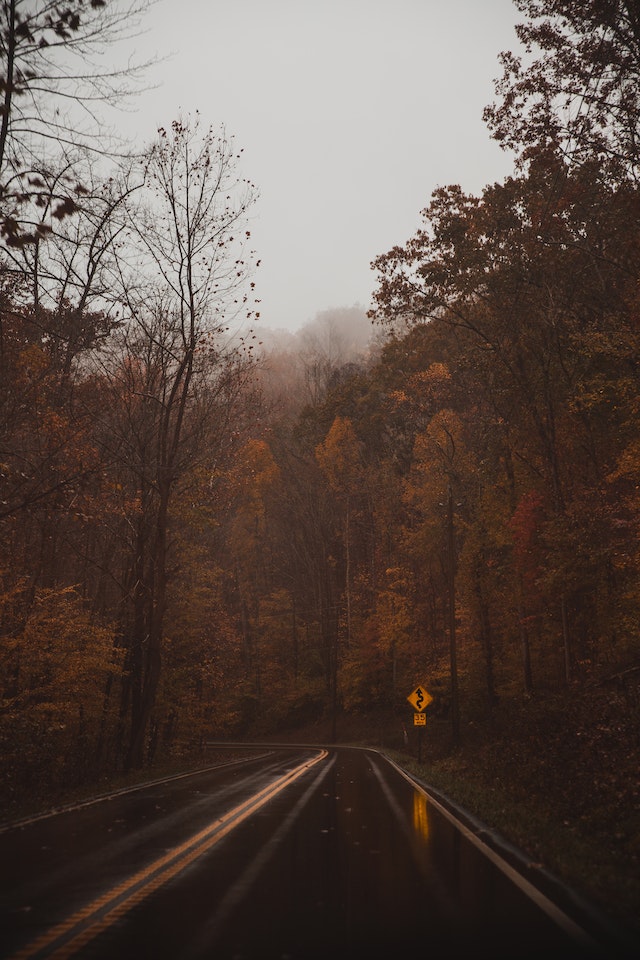
Let’s start this guided process by picking a photo from which to work. The image I’m loading into my interface is a free stock photo taken from the site Pexels. You can download the same image here if you want to follow along.
Interrogate CLIP Feature
To the right of the text prompt boxes, and just to the left of the “Generate” button, you will see a new button named “Interrogate CLIP”. This very nifty addition will inspect an image that you upload into the prior window and spit out a text prompt that the AI thinks will match the image.
Now keep in mind that this interrogation is not perfect and you will likely want to tweak it for accuracy. But it’s a very useful command that allows us to learn a little bit about how Stable Diffusion interprets image data.
Using the stock photo I selected, I ran “Interrogate CLIP” and got the following text prompt:
a road in the middle of a forest with trees in the background and a yellow sign on the side of the road, by Dan Smith
Adding Artist Names in CLIP
The interrogation mostly fits the photo, but it will often add an artist name to the prompt…and usually I’ll find that the artist name doesn’t really match the style of the photo. In this case, Stable Diffusion is suggesting an art style by “Dan Smith”. As far as I can find, Dan Smith is a graphic illustrator. I would prefer a photographic medium for my img2img variation, so I’ll be replacing “Dan Smith” with the name of a well-known photographer: Inga Seliverstova
There are a few other modifiers I would add to this prompt depending on what kind of art medium or style I want from my output image. I will add the following terms to my prompt:
- “realistic photo of” to inform Stable Diffusion that the image should resemble photographs over other formats of art or imagery
- “50mm lens” in lead Stable Diffusion towards more photos in it’s model training that used a narrow focal length
- “autumn” to specify that the image should have a warm color palette with red, yellow, orange leaves
My prompt now looks like this:
realistic photo of a road in the middle of an autumn forest with trees in the background and a yellow sign on the side of the road, by Inga Seliverstova, 50mm lens
Now before I generate an image from this new prompt, we need to review a few more controls in the Img2img work area.
Resizing Options
Just below the Upload Window, you’ll see three bubble buttons related to resizing and cropping. The button that you select will determine how Stable Diffusion crops your source image to match the image size of the desired output.
- Just resize means the AI will squash or stretch the image to match your output dimensions; this will usually cause distortion to the results.
- Crop and resize means the AI will cut down the source image to match the aspect ratio of your output dimensions and then resize; this will deliver the best results if your input and output dimensions will be in different aspect ratios.
- Resize and fill will adjust the output image to match the dimensions of your input image and then any extra space on the top, bottom, or sides will be filled with pixels of color from your image.
I always select Crop and resize for my images if they are not both square. It delivers the best results without distorted dimensions or extra noise borders.
Denoising Strength
Next, we’ll skip down past the step, size, batch, and CFG scale controls and instead look at “Denoising strength”. But what exactly does that term mean, and why is it important?
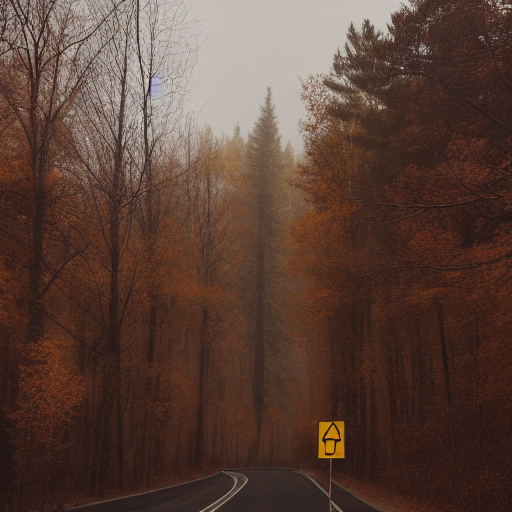
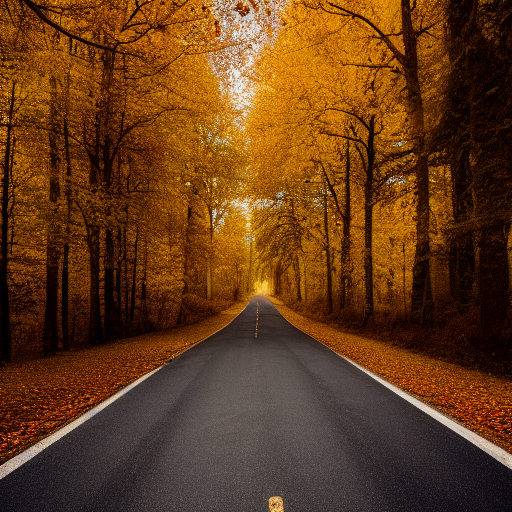
Denoising strength tells the AI how closely it should match the source image. If you select “0”, Stable Diffusion will generate an almost-exact image compared to your input; at “1”, the image it generates will have nothing to do with the input photo. The strength of denoising you choose will depend on how similar you want your output image to be when compared back to your source.
Let’s start generating variations to show you how low and high denoising strengths alter your results:
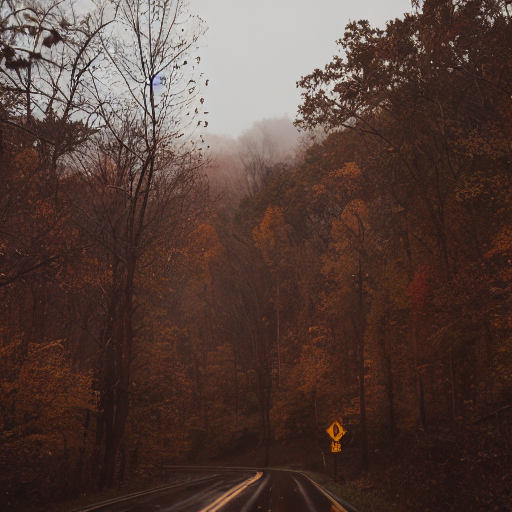
| 
| 
|
| Prompt: realistic photo of a road in the middle of an autumn forest with trees in the background and a yellow sign on the side of the road, by Inga Seliverstova, 50mm lens Resizing: Crop and resize Steps: 20 Sampler: Euler Size: 512×512 CFG Scale: 7 Denoising Strength: 0 | Prompt: realistic photo of a road in the middle of an autumn forest with trees in the background and a yellow sign on the side of the road, by Inga Seliverstova, 50mm lens Resizing: Crop and resize Steps: 20 Sampler: Euler Size: 512×512 CFG Scale: 7 Denoising Strength: 0 | Prompt: realistic photo of a road in the middle of an autumn forest with trees in the background and a yellow sign on the side of the road, by Inga Seliverstova, 50mm lens Resizing: Crop and resize Steps: 20 Sampler: Euler Size: 512×512 CFG Scale: 7 Denoising Strength: 0 |
Weighing Prompt vs Source
The higher a denoising number we used, the more our output image was based on the text prompt rather than the input image. You’ll also notice that, even at a strength of “0”, the image we got back was not an exact carbon copy: the winding road sign is clearly disfigured.
As you’ll learn on your Stable Diffusion journey, diffusion image generation has a few weakness—especially when it comes to drawing words, symbols, and fingers.
Inpainting & Outpainting
Another flabbergasting feature of Stable Diffusion is it’s ability to paint in new features to a pre-existing image…or at least to try!
Inpainting is the process by which the AI will add new subject matter into an image through the use of masking. Outpainting is the process by which it will expand an image and add more to the scene.
A Bit of Drawing Required
While these features sound amazingly useful, they require more skill than other aspects of Stable Diffusion. That’s because a high quality inpaint or outpaint will usually require you to edit the image slightly and then return it to Stable Diffusion. You don’t need extraordinary painting skill for this, but it will require a photo editing software.
Stay tuned for my in-depth guide just about inpainting and outpainting if you want to learn more. But just so you know the basics about the tool, let’s review its features.
Click over to the “Inpaint” tab to the right of “Img2img” just above the Upload Window. Now upload the stock photo again. You will see a black paintbrush tool appear over the image. This is how you can mask a section of the image to paint over it.
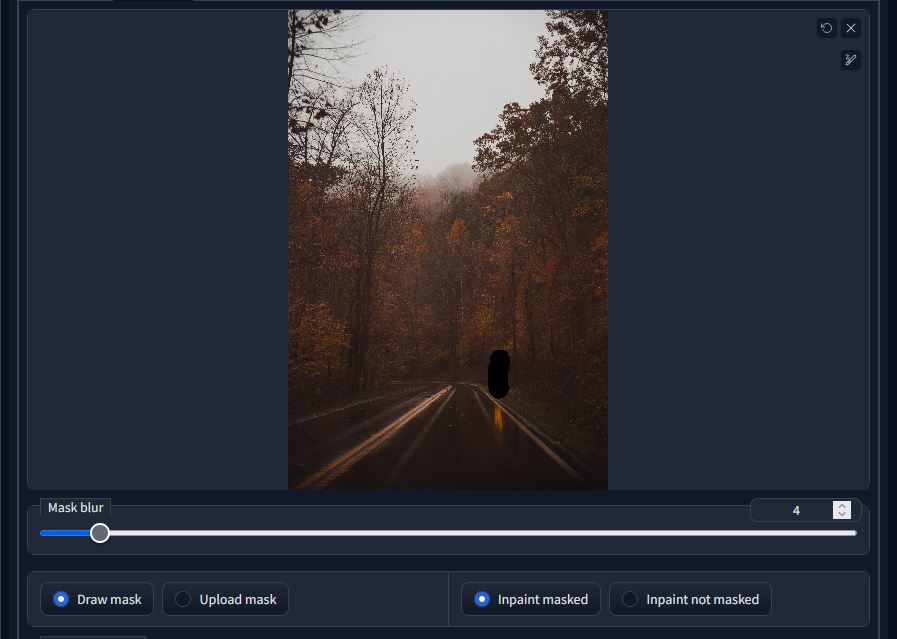
You’ll notice that a few more selection bubbles have appeared below the image.
- Mask blur is essentially the amount of feathering around the masked selection. Is smooths out the transition between the inpainted part and the original image.
- Draw mask will allow you to use the paintbrush and select your masked area inside of Stable Diffusion; Upload mask will instead let you upload an image with a mask for finer detailed selection.
- Inpaint masked will apply the inpainting changes to the area you masked with the paintbrush tool. Inpaint not masked will keep that masked area in tact but change the rest of the image based on your prompt modifiers. This is useful if you only want to keep a small portion of your image completely the same. You only have to paint a single small area and invert the effect, rather than painting in 90% of the entire image!
- Masked Content changes what the AI should put into the masked area that’s being replaced:
- Fill will erase the masked content and regenerate completely new content in it’s place
- Original instructs the AI to use the original content as a basis for what will replace it.
- Latent Noise will base the new content on colorful noise and then work it from a bunch of pixels into a full image through the process of denoising. For beginners, all you really need to know is that Denoising Strength must be set at or near 1.0 for Latent Noise to work. Otherwise, you just get colorful pixels.
- Latent Nothing is very similar to Latent Noise, but instead of starting with a bunch of colored pixel the AI will start with black fill.
Denoising Strength is Vital for Inpainting
If you remember just one thing about inpainting, let it be this: the Denoising strength setting will have a major impact on your results. Set it too low, and the AI will just smudge the image where you masked. Set it too high, and it may not blend right.
If you go with “original” as the content option, a good starting level would be 0.8 denoising with mask blur at 4. When using latent filler the denoising needs to be up at 1.
Batch Img2Img
The last to explore in Img2img is the Batch tab. This allows you to generate multiple images in one click from multiple source images. For the most part, this tab is useful for producing animations. You can input the frames of a video clip that’s been converted to jpgs, add a prompt that changes the art style, and then batch out the sequence images with a new look. From there, the AI-modified sequence can be re-stitched into a video.
Web UI Extra Features
That covers the 2 primary features of Stable Diffusion. However, the story is not over. Besides image generation, this particular Web UI has several other goodies baked into the pie. Let’s briefly explore those add-ons and utility pages.
Extras Tab
The Extras tab has two features: upscaling and face restoration.
- Upscaling is when an AI increases the resolution of an image. If you were to simply make a small picture bigger in Photoshop, the result would be blurry and pixelated. Upscaling uses machine learning to instead fill in the details of the image based on what it sees in the small version. The result is a full-sized image that actually looks high resolution, with no pixelation or blur.
- Face Restoration is a specialty AI script made to improve facial features. If you have an old photograph that’s torn or worn, then face restoration will deduce what the face should look like and fill in the damaged parts. Likewise, Stable Diffusion sometimes gives incorrect anatomy to portraits. Like eyes missing pupils or that are too big for the head, etc. Face restore also works on these images by “correcting” the construction of your AI faces.
Using Upscale
The Scale By/To settings are how you operate the upscaler. You can select 2 upscalers to run on the same image. The Web UI comes with several upscale models already installed, but you can add more as well. Certain upscalers work better for certain types of images (photorealism, paintings, etc).
- The Resize slider lets you choose how much bigger you want the upscaled image. A setting of 2 will make the output image 2 times bigger than it’s source.
- Upscale models are listed next. You may want to experiment with different models to find the one you prefer. I personally use a custom model named 4x_Valar for many of my AI images. You can browse through and download different models from this database.
How Do You Install an Upscale Model in Stable Diffusion
Models are installed simply by downloading the python file (usually a PTH or YML extension) and placing them in the following subfolders of your Web UI directory:
- stable-diffusion-webui\models\ESRGAN
PNG Info Tab
This section allows you to view the parameters used in an AI-generated image. This data is encoded into the image output and can be read back. In the left hand browse area that says “Source”, simply add an AI image. On the right hand side, you will be shown the following settings used when generating that image:
- Prompt
- Steps
- Sampler
- CFG scale
- Seed
- Size
- Model hash
This feature is incredibly handy for reverse engineering an image. If you generated something but can’t remember the prompt you entered? No problem, PNG Info will remind you. Found a cool AI image online and you want to see how it was prompted? This tab can do that, too.
Checkpoint Merger
This tab allows you to blend different models together to create a new model. However, the blending can be finicky. The output checkpoint isn’t always usable; it takes some trial and error to get a successful blend.
The merger feature also allows you to convert a regular pickle file into a SafeTensors file. SafeTensors are safer to use on a home computer, as the name suggests. If you want to know why, please read my guide all about pickle file dangers.
Create Aesthetic Embedding
Aesthetic embeddings are a custom embedding created by Victor Gallego. Unlike a textual inversion, they do not require training. Instead, you just point to a folder full of images. Stable Diffusion will then bias it’s output towards the visual style of that aesthetic embedding (when the feature is enabled on a prompt).
Aesthetic embeddings are valuable for tweaking an output image to more closely resemble a certain artist of art style. It’s not meant as a replacement for textual inversions or custom models, because it does not work for objects. It’s basically a style enhancer.
Settings
The settings tab allows you to tweak Stable Diffusion’s background settings and image saving directions. From this section, you can modify:
- How and where Stable Diffusion saves generated images
- How the upscaler handles requests (like tile size, etc)
- How strongly face restoration applies when added
- VRAM usage
- CLIP Interrogation
- User Interface preview settings
Most of these Settings panels you won’t need to mess with. At most, you may want to change with Face Restoration model to use as default and how strongly it should weigh into generations.
Extensions
Lastly, the Extensions tab lists all of the add-ons you have installed into the Web UI. From here, you can install new scripts or update the ones you already have.
Conclusion
By now, you should understand all the basic features of Stable Diffusion. Which puts you light years ahead of the public majority! The only thing left to do is experiment to your heart’s content.

