Part 1: Using Txt2Img in Stable Diffusion Web UI
So you’ve recently learned about AI art and a software called Stable Diffusion. Welcome to the wonderful world of computer-generated art! While it may look complicated to operate Stable Diffusion at first glance, the controls are actually quite simple.
In this tutorial, I want to explain the various parameters of this powerful AI in simple terms. We’ll look at every little lever and thingamabob inside the standard web interface and learn what they do. But don’t worry if you have a slightly different interface than, because these parameters will be the same on almost all versions of Stable Diffusion: whether you’re using a web UI, online service, or working from the command line. By the end of this guide, you’ll be one step ahead of your peers. You’ll possess a thorough understanding of which controls affect what outcome in your art—so that you can make better art with less hassle!
A 2-Part Guide Starts Here
This is the first installment of a mini tutorial series.
- Here in Part 1, we will review the TXT2IMG settings.
- In Part 2, we’ll continue to the IMG2IMG settings and look at some common add-ons, too.
Technical Details
For this guide, I will be using Automatic1111’s Web UI running on my own computer. This is one of the most popular UI’s available and I would recommend it for people who have sufficiently powerful Nvidia graphics cards. (Not sure if you’re system can run Stable Diffusion? Go check this quick guide to find out). While this version may have some extra features and extensions, the primary controls should be the same on any version of Stable Diffusion.
Quick Notes before we start: All my example images in this guide were done at 512×512 pixels unless stated otherwise. Your generation time and capabilities will differ based on your own computer’s hardware. I am running Stable Diffusion locally and my computer has the following specs:
- CPU: AMD Ryzen 5 3600
- RAM: 16GB
- GPU: Nvidia GeForce RTX 3060 with 12GM of VRAM
Txt2Img
Stable Diffusion can generate images from 2 primary inputs: a standalone text description of what you want the image to be, or an image with a complementary text providing more information about the desired output. These two types of generation are referred to, respectively, as “txt2img” and “img2img” (pretty straightforward so far).
In most interfaces you’ll encounter, the primary panel will be txt2img. When Auto’s UI is loaded, this is the first tab to the left at the top. So let’s start by looking at the parameters that are tweak-able when converting text to an image.
Prompt
When you initialize Stable Diffusion (on your computer or using an online provider), the first feature you will likely notice is a text box titled “Prompt”. As obvious as it sounds, this box is where you will describe the picture you want to see so the AI knows what to make. This is perhaps the single-most important parameter in Stable Diffusion. The difference between a good image and a heap of meaningless pixels often comes down to the text prompt you write.

While prompt writing is a whole topic unto itself, I’ll give you the basics of how to use the Prompt box. To create an image from text, you need to generally tell the AI three things:
- What content should be in the image (what subject matter, background, etc. you want to see?)
- What medium the image should look like (do you want a painting? Or a photograph?)
- What style the image should emulate (do you want it to look like a specific artist?)
You can be as generalized or as specific in your text description as you want. A big part of playing with AI art is learning which prompt structures work for you and which generate passable results. Let’s look at an example prompt; for this example, we’ll leave all of the other parameters at their default for now.
Our practice prompt is:
A painting of a Kyoto cityscape by Satoshi Kon
When we hit generate, the AI will use what it knows about this text description’s elements to create an image. Let’s break down our prompt and look at each phrases impact on the end result.
A painting of a Kyoto cityscape by Satoshi Kon
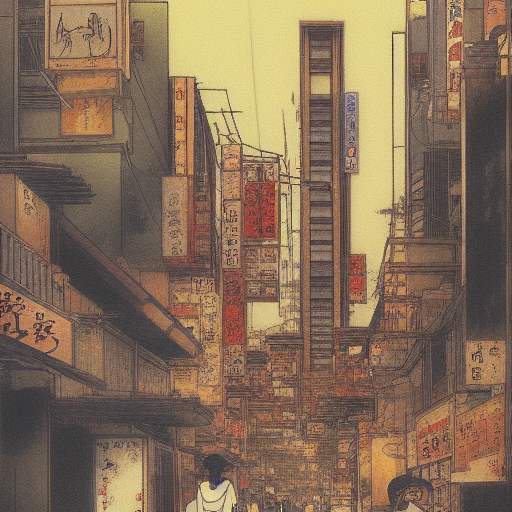
“A painting” is our medium modifier; we are telling Stable Diffusion to draw on what it knows about paintings when making the piece of art. This is a very general modifer, as paintings come in many different styles (impressionist, digital, abstract, etc) and can be done in a variety of mediums (watercolor, acrylics, etc).
“Kyoto cityscape” is our subject qualifier; Stable Diffusion will ruminate on all the images it’s scene of Kyoto, cityscapes, and cityscapes in Kyoto, to determine what such an image would look like. This term is a moderately specific, as we’ve noted which city the AI should take inspiration from rather than just ask for any old cityscape.
“by Satoshi Kon” is our style modifier; Stable Diffusion will use this text to take whatever image we’re asking and try to make it look like the specific artist’s style. A good tip here is to know what an artist’s style looks like and what kind of mediums and subjects are most common for that artist. Doing this will help the AI to make a more believable image.
If, for example, we asked Stable Diffusion to make a pencil sketch in the style of Wes Anderson (a film director), it may have trouble anticipating what such an image would look like because it doesn’t have pencil sketches by Wes Anderson in it’s references. It might then spit out something garbled or unrelated to your prompt.
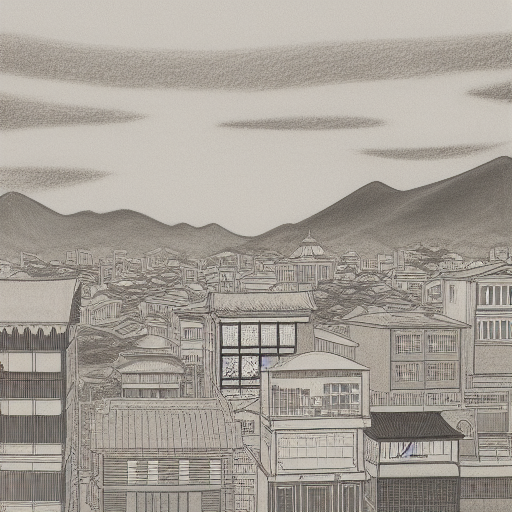
(actually, this example worked quite well! Never underestimate the power of AI learning!)
Negative Prompt
Directly underneath the main Prompt box is another text box titled “Negative Prompt”. This is the area where we can specify things we do not want to see in our output image. In our last generation, you’ll notice that the image came out in black and white. I like the style of the image, but I would prefer something in color. We could change the regular prompt to specify a “colored pencil sketch”, but first let’s test out the negative prompt.
I will add the terms “monochrome” and “black and white” to the negative prompt. I’ll separate them with a comma to specify they are two separate terms. While these terms have very similar meanings, I want to exclude both of them because I don’t know which phrase the AI is more likely to associate with this image style. Let’s look at the results when I generate the image with this negative prompt:
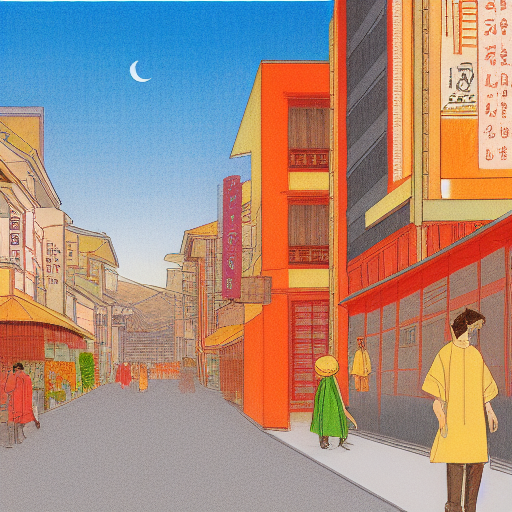
Not too bad…but what if I want to avoid having people appear in the image? Let’s add the term “people” to the negative prompt as well and see what happens:
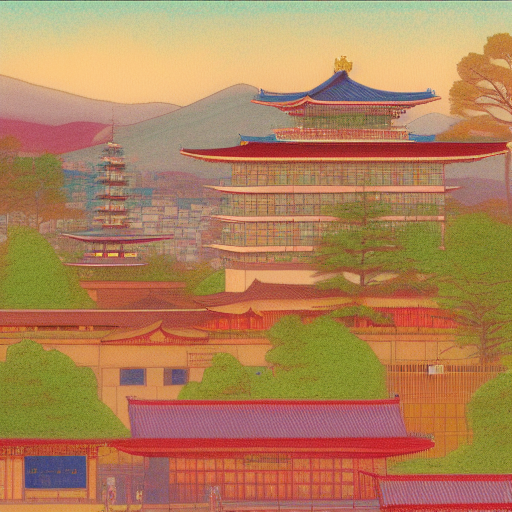
As you can see, even one word added to the positive or negative prompt sections can affect the results that Stable Diffusion gives us. Let’s move on to the other parameters before we get to bogged down in this topic. Prompt writing really is an entire lesson unto itself.
Sampling Steps
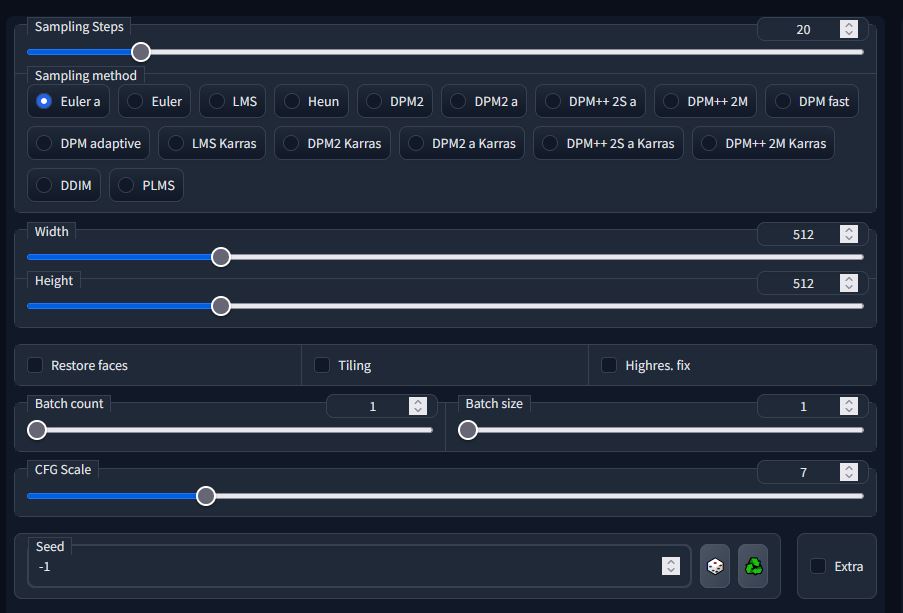
The first slider you’ll see in this web UI is labeled “Sampling Steps”. Steps refer to how many passes the AI will make when taking visual noise and refining it into your desired image. Think of it like layers of paint put down by a painter. A painter will start with a wash which has no details at all; next, he will add large blocks and shapes of paint to get the overall design of the painting on the canvas; once that dries, he can then take a smaller brush and paint in the details of the piece.
Stable Diffusion operates in a similar fashion: when you give the AI a prompt to generate, it starts with nothing but a canvas of latent space. Which each step, it puts another layer of “paint” down on that latent space, first with blurry blocks of color to define what goes where. With each extra step, the AI will add more and more detail to the image until it reaches the number of steps that you specified.
Steps vs Quality
Now, this explanation may lead you to believe that more steps mean better pictures. But that’s not always the case. At a certain point, adding more steps doesn’t help improve the quality of an image; it can actually cause the image to start looking overworked.
If we go back to the painter analogy, we will find that the painting he puts on canvas only needs so many layers before it forms a coherent image. If he keeps piling on layers of paint, the image will start to look messy. Let’s say this hypothetical painter is making a landscape with pine trees. If you ask him to keep adding more and more detail after the landscape is already there, all he can do is add increasingly minute details to the canvas. If he spends long enough doing that, he might brush individual pine needles onto every tree in the whole forest…and lose his mind in the process!
Stable Diffusion works in a similar way: at a certain point, the noise becomes coherent enough to make a clear image. If you keep pushing for more steps beyond that point, the AI will have no choice but to keep looking for tiny minute details to throw in here and there. If you push too hard, it will start making up weird details just for the sake of adding more to the image.
Goldilocks Zone of Denoising
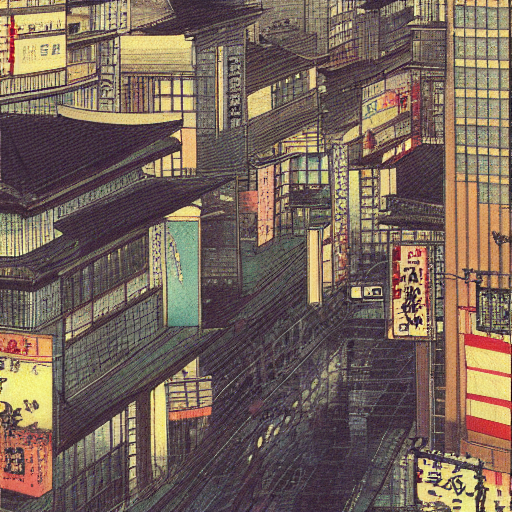
Suffice to say, there is a Goldilocks zone of denoising. The number of steps you should aim for will depend on your preferred subject matter and art style. We will discuss that topic further in another article. For beginners, I would recommend using 20 or 30 steps.

| 
| 
|
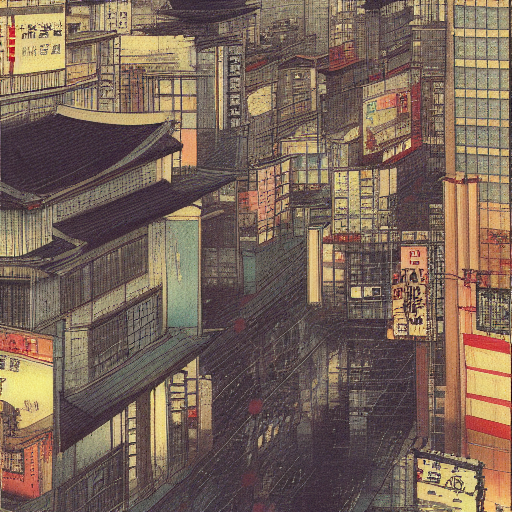
| Prompt: A painting of a Kyoto cityscape by Satoshi Kon Steps: 2 Sampling Method: Euler Size: 512 x 512 pixels CFG Scale: 7 Seed: 2691516055 Time to Make: 0.81 seconds | Prompt: A painting of a Kyoto cityscape by Satoshi Kon Steps: 20 Sampling Method: Euler Size: 512 x 512 pixels CFG Scale: 7 Seed: 2691516055 Time to Make: 3.84 seconds | Prompt: A painting of a Kyoto cityscape by Satoshi Kon Steps: 100 Sampling Method: Euler Size: 512 x 512 pixels CFG Scale: 7 Seed: 2691516055 Time to Make: 25.37 seconds |
As you can see from this comparison, there are diminishing returns when increasing steps. The difference between 2 and 20 steps is much greater than the difference between 20 and 150. The generation time also goes up with every additional step you add. Keep that in mind if you have limited CPU or GPU resources.
Sampling Method
Just below Sampling Steps, you will find several selection bubbles labeled with “Sampling Method”. I was not a mathematics major, so I can’t explain to you exactly how these operate. But, in layman’s terms, this image generation process works by giving a computer images that were reduced to noise and teaching it how to recreate the original image. There are fancy and confusing mathematical equations involved to accomplish this.
In short, each Sampling Method is just a different approach on how to solve the equations that make image generation possible. As a result, each method will give you a final image based on your prompt, but will have small nuances of difference because they got to the end result in a slightly different way.
I liken this to baking a chocolate cake. You and your friend start with the same ingredients, but you each follow your own set of directions that marginally vary. Both of you will end up with a chocolate cake at the end, but the way in which you mixed and cooked yours will make it somewhat distinct from the one your friend finished. So Sampling Methods are like different techniques to bake the same chocolate cake.
In Stable Diffusion, there are a variety of sampling methods available. We’ll wait to discuss their difference at length in another article. For now, I would recommend that you start with Euler or Euler a as you begin your image generation journey.
Image Size
Next, we see the Width and Height parameters. These are quite self-explanatory. With these sliders, you can control the size of your output image. It sounds simple enough, but keep these two points in mind when changing the output size:
- Divisible Numbers. Please note that, when you drag the sliders around, the numbers on the right will change in increments of 64. This is quite important, as all images generated by Stable Diffusion must be in a size divisible by 64. If you try to enter a custom non-divisible size (for example, you want a video-sized thumbnail at 1920×1080 pixels) and hit generate, you will get an error instead of an image. So if you’re after a specific image size, you’ll want to generate an image with the closest aspect ratio and crop to your desired size in a photo editor later.
- Size Limits. Just as importantly, you need to understand that the image size the AI can generate is dependent on the hardware capabilities of your GPU. The larger an image size, the more pixels involved and—as a result—the more time and processing power it will take to make the image. If you choose a height and/or width that is too big for your GPU to process, you will get an error instead of an image. Thankfully, there are many different AI upscaling solutions you can use to increase the image resolution of your creations later. We’ll talk about that in another guide.
Now the aspect ratio of your image will not only impact the processing time: it can also change the way that Stable Diffusion composes the image. I’ve seen it happen many times now where a widescreen aspect ratio, when paired with a human portrait prompt, generates odd results or duplicated faces because the AI is trying to fill in the extra space. As a generally rule of thumb, you should stick to square or vertical sizes for better portrait results.
Batch Count & Batch Size
Batches refer to how many images you want Stable Diffusion to generate in one go with your current prompt and settings. It’s like putting multiple pans of cookies in the oven. Batch count is how many cookie sheets you put in the oven, while batch size is how many cookies (i.e. images) will be on each sheet.
Just keep in mind that, the more images you ask Stable Diffusion to generate in one sitting, the longer your wait time will be. I would recommend starting with small batch sizes until, between one and four images, as you get a feel for which prompts will give you what results.
CFG Scale
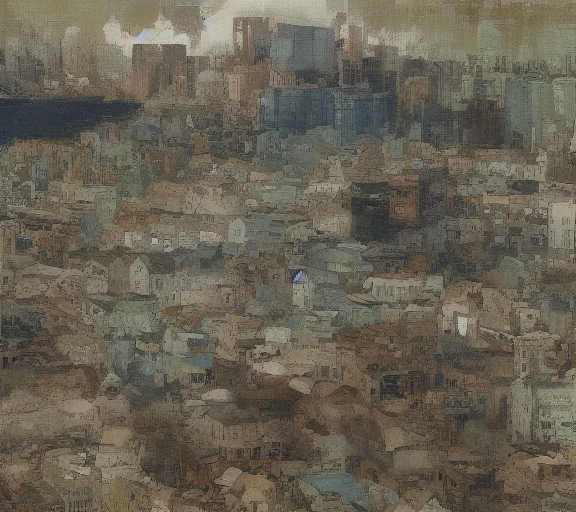
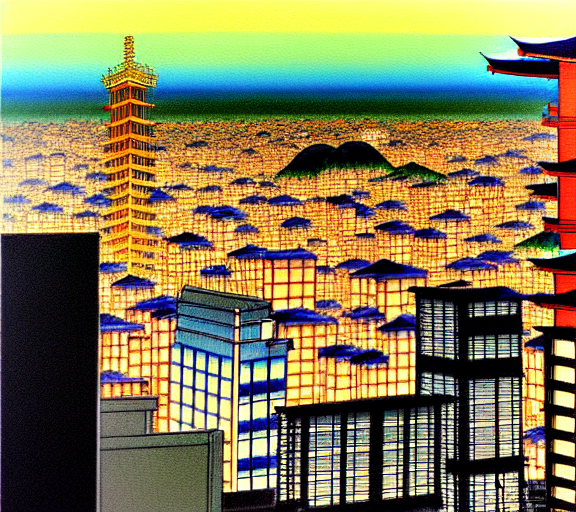
The CFG Scale stands for “Classifier Free Guidance Scale”. That sounds overly technical, but really this slider just controls how closely the AI will follow your prompt when generating an image. The higher you set the scale, the more strictly Stable Diffusion will interpret your prompt; the lower you set the scale, the more creative it will get in making the output image. Let’s look at two extreme examples while building upon our initial practice prompt.
Here are the results of “A painting of a Kyoto cityscape by Satoshi Kon” with a low CFG (at 1.5, the AI gets a lot of freedom with this prompt) and then at a high CFG (28, the AI is strictly trying to capture exactly what the prompt says):
| 
|
| A painting of a Kyoto cityscape by Satoshi Kon CFG Scale of 1.5 | A painting of a Kyoto cityscape by Satoshi Kon CFG Scale of 28 |
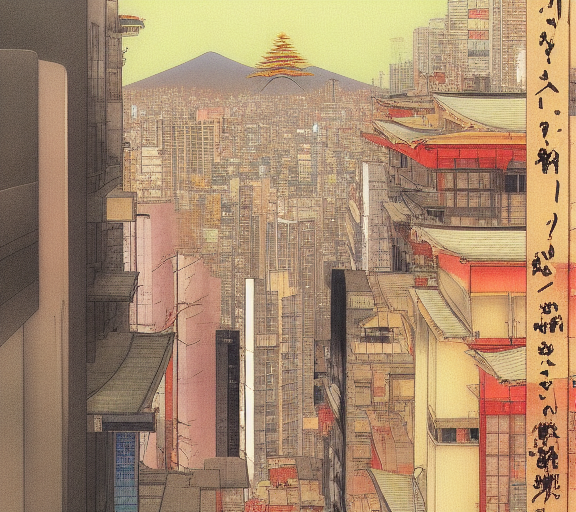
As you can see, having an extreme in either direction can make the results look a bit…odd. A good middle ground is too leave the CFG between about 7 and 12. For txt2img, I rarely tweak the CFG unless the AI is throwing a lot of extra stuff into the image that shouldn’t belong. Here is another generation with the CFG Scale positioned at 7.5, giving a more comprehensible but creative result:
Seed
A seed is a string of numbers that identify each individual image the AI generates. Every image that comes out of Stable Diffusion will have a seed number. But seeds don’t end there. If you like the visual style of a specific image, you can re-use that same seed number with a different prompt to generate an image with similar visual characteristics to the original image from which that seed was pulled.
Let’s say I really liked the look of our very first image and I want to use different prompts with a similar aesthetic. I will first click on the green recycling symbol next to the seed box. This is show the seed of whatever image we last generated. Next, I will copy and paste the seed from our original generation into this box in place of the seed it’s currently showing. (Stable Diffusion saves the output images with the seed number in the file name by default; so to retrieve that seed I will go to my output folder and copy it from the image’s file name).
For this example, my seed is: 2323820377
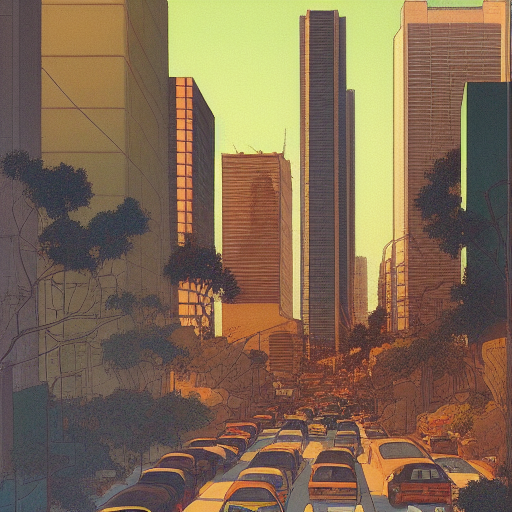
With that seed now locked in, let’s change our prompt a bit. I will change the subject matter from “a Kyoto cityscape” to “Los Angeles”. Here are the results side-by-side for comparison:

| 
|
| Prompt: A painting of a Kyoto cityscape by Satoshi Kon Steps: 20 Sampler: Euler a Seed: 2323820377 CFG Scale: 7.5 | Prompt: A painting of Los Angeles by Satoshi Kon Steps: 20 Sampler: Euler a Seed: 2323820377 CFG Scale: 7.5 |
Extra Text2Img Features
Now that we’ve covered the basic features inside Stable Diffusion’s txt2img technology, let’s look at some of the features specific to this Web interface (again, I’m using Automatic1111’s Web UI). These include:
- Restore Faces
- Tiling
- Highres Fix
Restore Faces
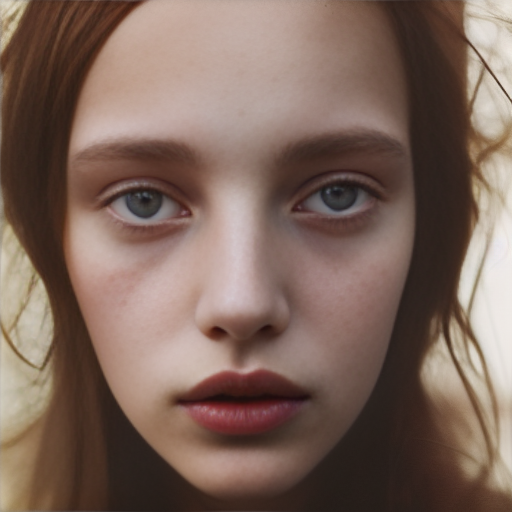
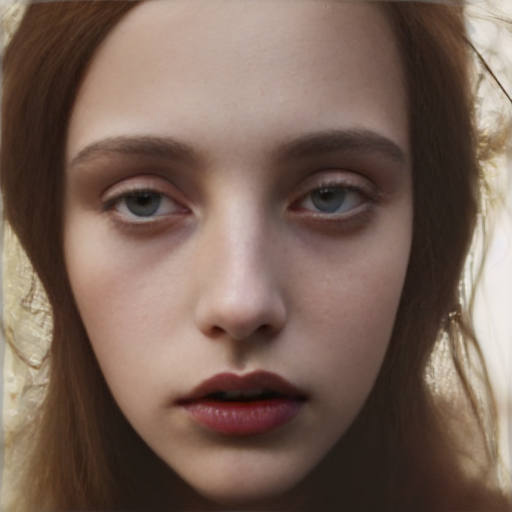
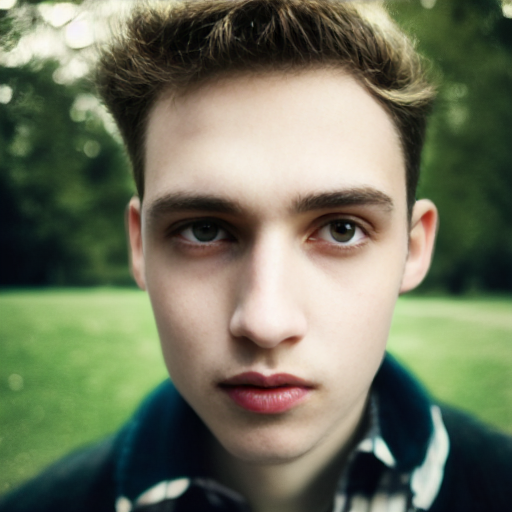
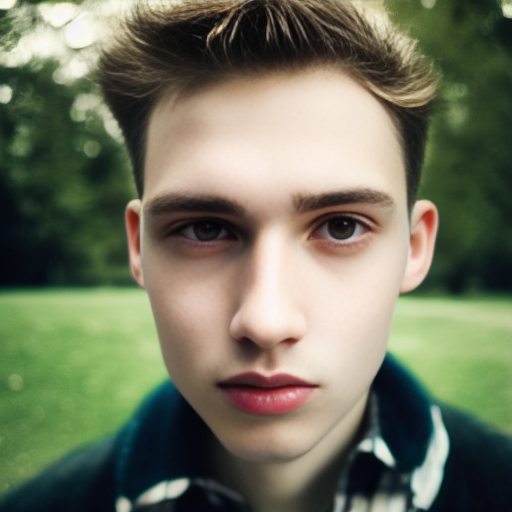
Restore Faces. When checked, this feature instructs Stable Diffusion to apply an additional algorithm to the generation process that is designed to improve the appearance of human faces. In the Web UI settings, you can specify which algorithm you want to use: Codeformer or GFPGAN. Codeformer is a model that was actually designed to quite literally restore faces in old photos that have damage to them; GFPGAN is an AI model (a GAN model to be exact) that does the same thing but in a slightly different way.
Generally, both models are good but have a different nuance to the way they process eyes. Codeformer has a bit more highlight or sparkle to eyes for a photorealistic look, while GFPGAN can provide more cartoon or anime-style eyes. In my personal experience so far, I usually prefer the results from Codeformer.
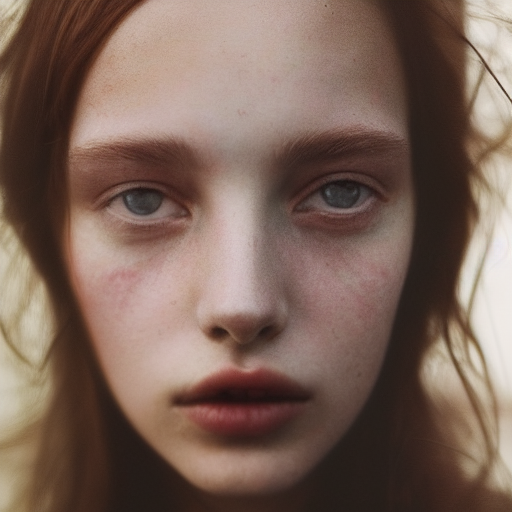
Below is a side-by-side-by-side comparison of three portraits with the same seed: first with no face restoration, then with Codeformer, and then with GFPGAN.
| 
| 
|
| Prompt: A photo portrait of a beautiful young Dutch woman by Marta Bevacqua, detailed, realistic, 50mm lens Steps: 20 Sampler: Euler Seed: 1973059559 CFG Scale: 7.5 NO FACE RESTORE | Prompt: A photo portrait of a beautiful young Dutch woman by Marta Bevacqua, detailed, realistic, 50mm lens Steps: 20 Sampler: Euler Seed: 1973059559 CFG Scale: 7.5 GFPGAN at 0.15 weight | Prompt: A photo portrait of a beautiful young Dutch woman by Marta Bevacqua, detailed, realistic, 50mm lens Steps: 20 Sampler: Euler Seed: 1973059559 CFG Scale: 7.5 Codeformer at 0.15 weight |
Here is another portrait example, same side-by-side:

| 
| 
|
| Prompt: A close-up photo portrait of a handsome young American man in a park by Marta Bevacqua, detailed, realistic, 50mm lens Steps: 20 Sampler: Euler Seed: 1364391388 CFG Scale: 7.5 NO FACE RESTORE | Prompt: A close-up photo portrait of a handsome young American man in a park by Marta Bevacqua, detailed, realistic, 50mm lens Steps: 20 Sampler: Euler Seed: 1364391388 CFG Scale: 7.5 GFPGAN at 0.15 weight | Prompt: A close-up photo portrait of a handsome young American man in a park by Marta Bevacqua, detailed, realistic, 50mm lens Steps: 20 Sampler: Euler Seed: 1364391388 CFG Scale: 7.5 Codeformer at 0.15 weight |
As you can probably see, both Codeformer and GFPGAN dramatically improve faces but with different flavors. Like I mentioned earlier, notice how the young man’s eyes glint more when using Codeformer as opposed to GFPGAN. Meanwhile, the young woman I generated did not have much glint to her eyes but the proportions of her face improved with both restoration models.
Tiling
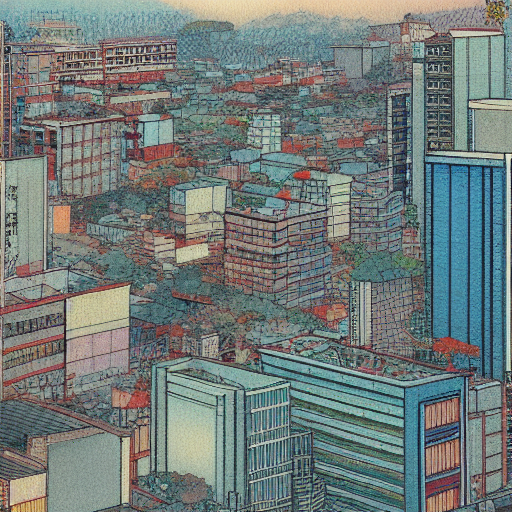
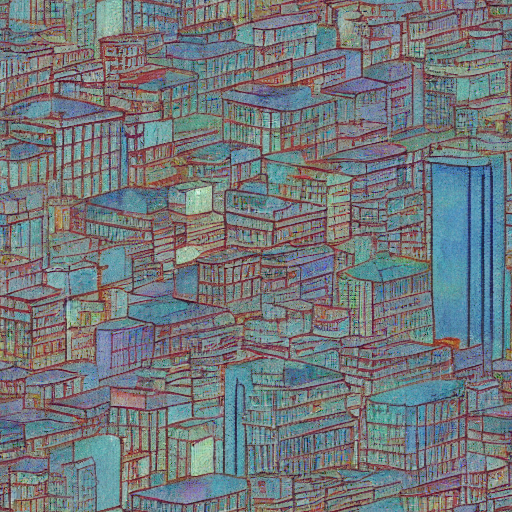
Tiling is an extremely useful feature for graphic designers! This option, when checked, makes the output image seamless—that is, you’ll be able to tile the image much like a fabric or wallpaper design (I mean that you would find for actual walls, not a computer desktop).
Going back to our original practice prompt, I generated another image using a similar (but slightly altered) prompt with a fresh random seed (to get back to using randomized seeds, click on the dice symbol next to the seed box). I then recycled that seed and regenerated the image with tiling on.
Here is a comparison of an image with the same seed, without and then with tiling enabled:
| 
|
| Prompt: A painting of a Kyoto city skyline by Satoshi Kon Steps: 20 Sampler: Euler Seed: 3738328424 CFG Scale: 7.5 No Tiling | Prompt: A painting of a Kyoto city skyline by Satoshi Kon Steps: 20 Sampler: Euler Seed: 3738328424 CFG Scale: 7.5 Tiling Enabled |
Then I took the second image and actually stacked it 2 by 2 in Photoshop to see how well it actually tiled:
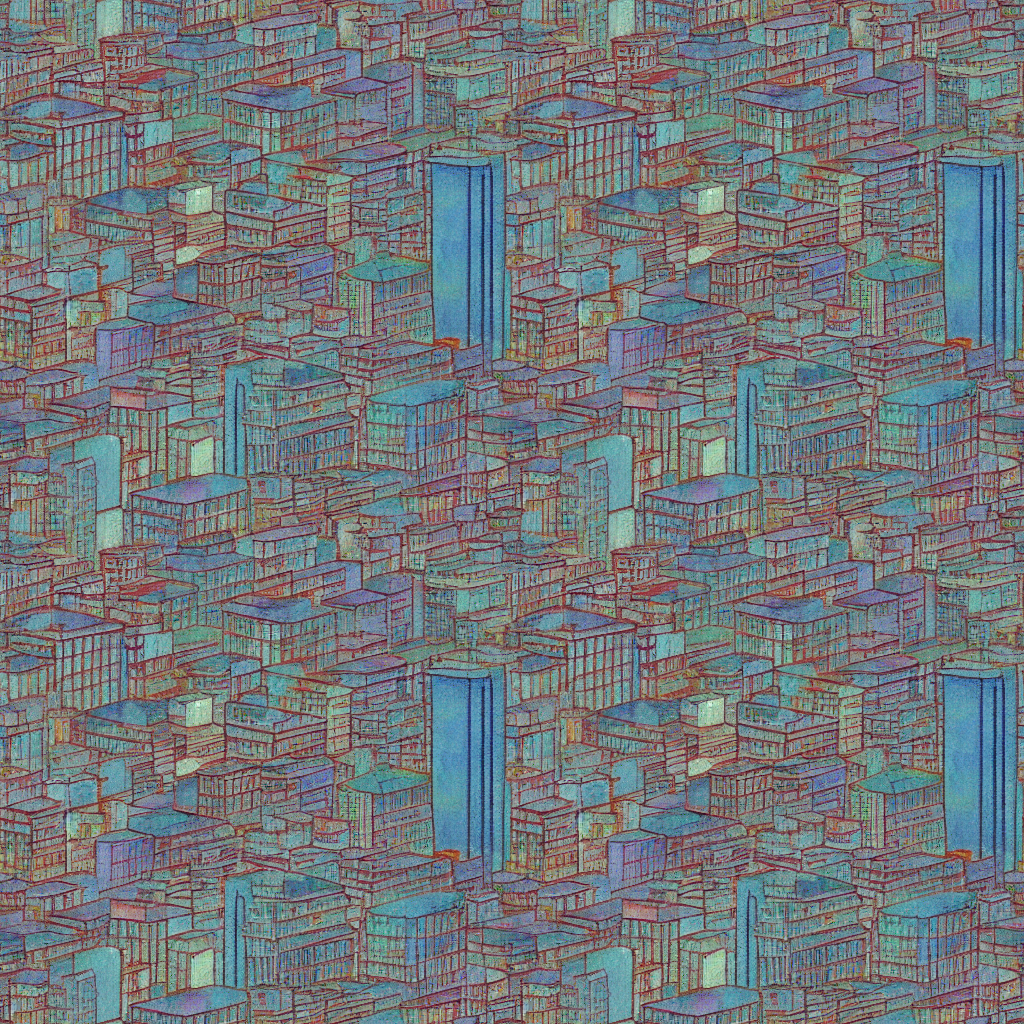
Now that makes for one very neat lo-fi pattern, if I may say so myself.
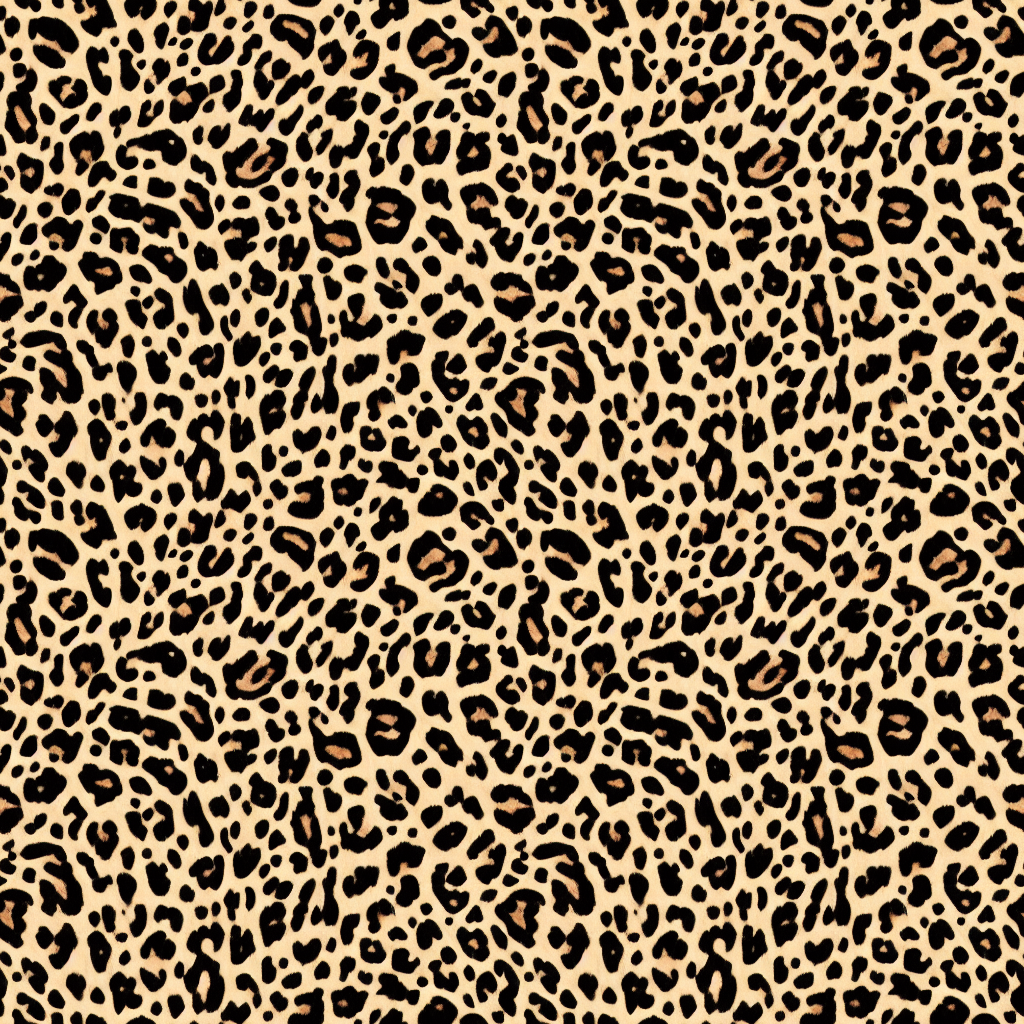
This feature really shines with simpler designs like you would normally find in seamless patterns. Just for a quick example, here is a basic animal print I made using the tile feature (this is how the image looks when tiled 2×2):
Highres. Fix
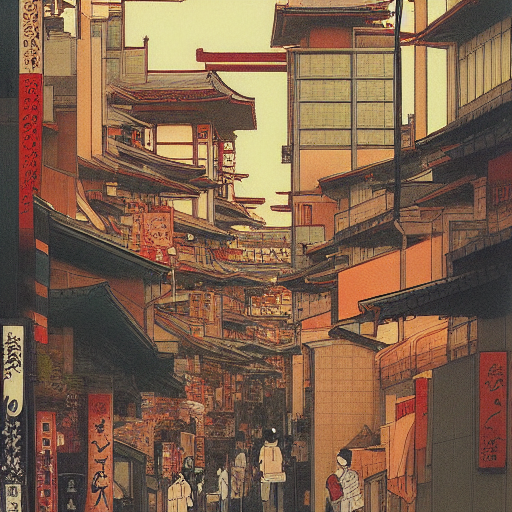
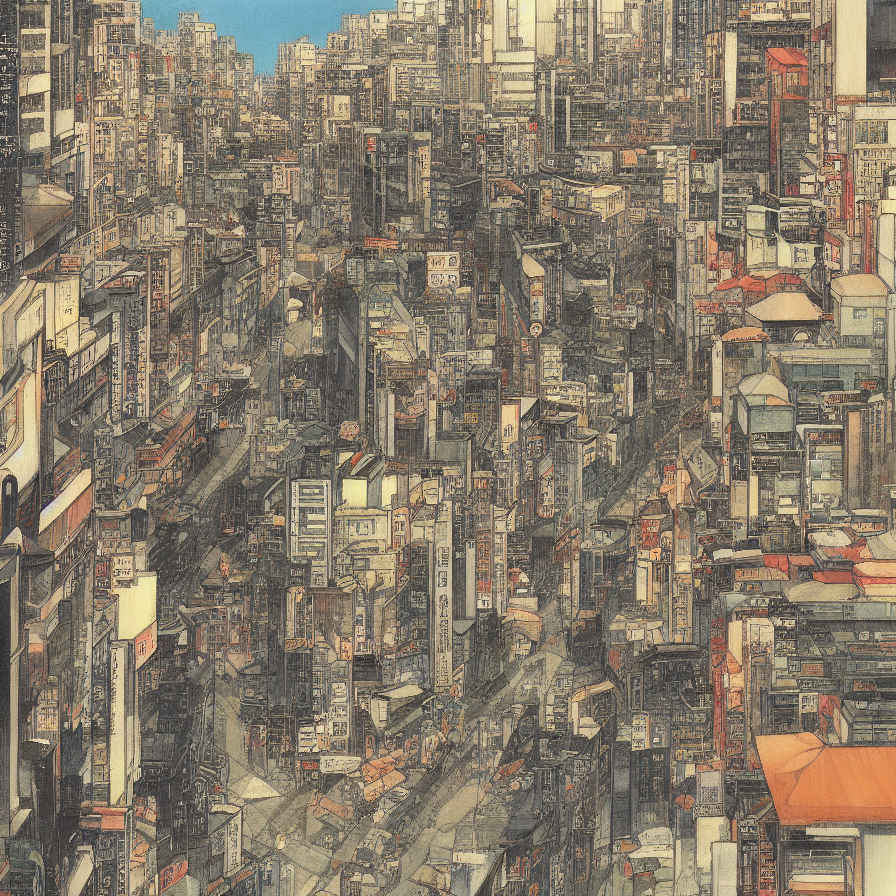
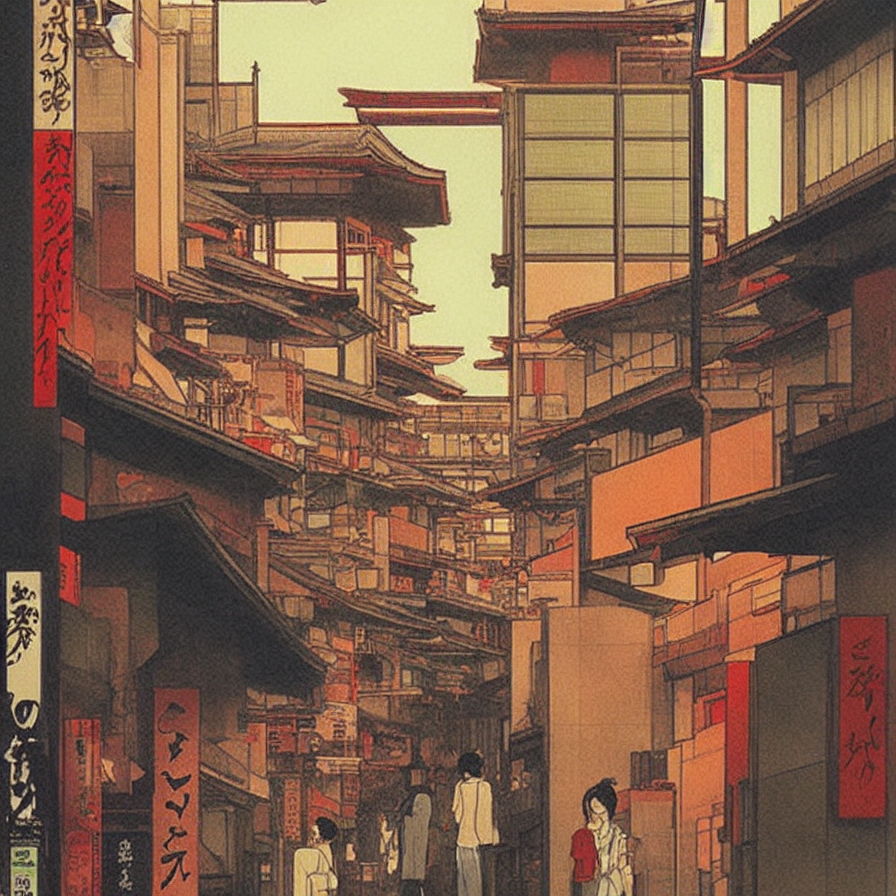
Stable Diffusion has trouble with adding details to images with higher resolutions. To help with that, this web interface has a “Highres. Fix” option. What this does is start rending the image at a lower resolution, then it upscales that render and continues adding in details at a higher resolution. Here is a generation using our original prompt text but as a comparison done at low resolution, high resolution, and lastly high resolution fix enabled.
| 
| 
|
| Prompt: A painting of a Kyoto cityscape by Satoshi Kon Steps: 20 Sampler: Euler Seed: 2323820377 CFG Scale: 7.5 Size: 512 x 512 Highres Fix is OFF | Prompt: A painting of a Kyoto cityscape by Satoshi Kon Steps: 20 Sampler: Euler Seed: 2323820377 CFG Scale: 7.5 Size: 896 x 896 Highres Fix is OFF | Prompt: A painting of a Kyoto cityscape by Satoshi Kon Steps: 20 Sampler: Euler Seed: 2323820377 CFG Scale: 7.5 Size: 896 x 896 Highres Fix is ON (Firstpass W+H are both 512 and Denoising at 0.3) |
As you can see, increasing the dimensions vastly changes the composition-even though the prompt, sampling, and seed are all the same! With Highres fix checked on, we can tell Stable Diffusion to take the image it would have generated at 512×512 pixels, upscale it, and add some more detail.
Highres fix can be very helpful if you make an image you like at a low resolution and want to bump up the size in txt2img without losing the initial composition.
Output Controls
Before we wrap things up, you need to know about the buttons that let you export images. Let’s review the output panel.
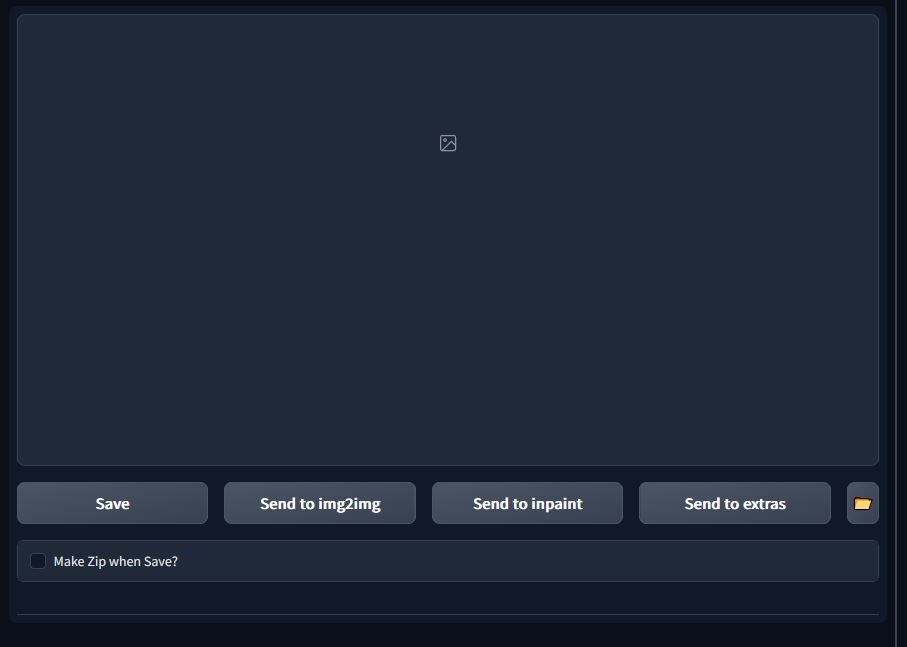
On the right-hand side of the interface you will find the image previewer and several buttons related to image output. Let’s briefly review each one:
Save
As you may expect, this button allows you to save a generated image to a directory of your choice. When you click save, a PNG filename will appear below the output buttons with a clickable link that says “download”. Choosing “download” will allow you to pick what folder on your computer the image will be saved into.
Keep in mind that, even if you don’t save the image with this method, it is still saved in an output directory specified by Stable Diffusion. Every image you generate in this web interface will be kept in the following directory (unless you modify the settings for someplace different):
C:\stable-diffusion-webui\outputs\txt2img-images
Send to Img2img
This button will take the currently selected image and move it over to the Img2img section. From here, you can do a variety of AI generation operations with this image used as the source. We’ll get to those img2img features in the next articlel, but in short you can do things like expand the image’s size or create variations based on the source image.
Note that when you use this button, it will also transfer your source image’s text prompt over to Img2img as well.
Send to Inpaint
The Inpaint button works the same as the “Send to Img2img” button, except that this command will send your selected image to the “Inpaint” tab in the Img2img work area. From here you can do inpaintings; we will discuss exactly what inpainting is in Part 2 of this tutorial series.
Send to Extras
This button will send your selected image to the “Extras” section where you can upscale it. Upscaling is the process of increasing the dimensions and resolution of an image without making it blurry. We will talk about Upscaling later in this guide and in other articles.
Output Directory
The right-most button in the output are is an open folder symbol. This simply opens up the default output folder via Windows Explorer.
Part 2: Img2img
By now, you should have a solid understanding of Txt2img in Stable Diffusion. In the next part of this tutorial series, we will move to the Img2img section of the Web UI and learn about inpainting, upscaling, and more.
