Are you trying to create AI art with Stable Diffusion, but all your creations are coming out as blank black output images? This is a common error and, thankfully, there are several ways to troubleshoot and fix it. In this guide, I’ll show you the most common causes for this issue and how to resolve each.
Why Is Stable Diffusion Generating Black Output Images?
There are several reasons why Stable Diffusion might create black output images. The primarily causes are usually:
- the safety filter getting triggered,
- an error from the installation process, or
- a lack of VRAM to complete image generations.
In addition to VRAM issues, there are other hardware requirements for using Stable Diffusion that could cause black output errors. Only Nvidia graphics cards are officially supported. So if you are trying to run it on an AMD GPU, then you may be getting errors due to a lack of CUDA support (this is an infrastructure specific to Nvidia cards that Stable Diffusion relies on for working).
How Do I Fix It?
Because this issue can be caused by a number of errors, it’s best that you go through all 5 of the following checks to correct it:
- Safety Filter – check if the NSFW filter is being triggered
- Python Version – make sure you are running the correct version of Python on your computer
- File Directory – the file folders where you install Stable Diffusion cannot have any spaces, check if that’s the case
- Checkpoint File – check to see if your model file is corrupted or in the wrong subfolder.
- Low VRAM – you may not have enough VRAM to complete a generation, but there is a line of code that can fix this on many GPUs.
1. Double Check the Safety Filter is Off
This error could simply be the safety filter. Stable Diffusion has a default setting that prevents NSFW (i.e. nude or violent) content from being generated. If the filter is on and gets triggered by your prompt, then the software will output a black image.
Safety Filter with Online Services
Are you using an online service of Stable Diffusion like DreamStudio? If that’s the case, then there is no way to remove the NSFW filter. You’ll need to ensure that your that do not include any sexual or violent content suggestions.
Safety Filter with Local Installation
Are you using a local installation of Stable Diffusion? Then double-check that the NSFW filter is disabled.
Automatic1111’s Web UI has the filter disabled by default. If this is the interface you are using, then it’s likely not the filter giving you this error. Move to Check #2 (Python Version).
If you are running a command line version of Stable Diffusion, then try the code edit below to disable the NSFW filter:
- Locate the file “txt2img.py” in your Stable Diffusion installation directory
- Open “txt2img.py” with a text editor (like Notepad, but I recommend Notepad++)
- Around line 90 or so, you should see some code that start with: “def safety checker”
- Add a section underneath the Safety Checker section that has the following code:
def dummy(images, **kwargs)return images, False
pipe.safety_checker = dummy
Now test out the prompt taht did not work before. Are you still getting a black output image? Try a different test prompt that’s unlikely to cause a NSFW output. Still getting a black output image? Them move onto the next fix…
2. What Version of Python Do You Have?
If you installed Stable Diffusion on your own computer and have a web interface like Automatic1111’s Web UI, then you must have a specific version of Python installed. If you use the wrong Python release it will cause errors.
You need to use Python V3.10.6 for Stable Diffusion.
Check that your Python version is correct by doing the following (this is Windows users):
- Open Powershell as an administrator. (If you have Windows 10, type “powershell” into the Search bar on your toolbar)
- Enter the following command:
python –version
- Powershell will spit out the version number of Python
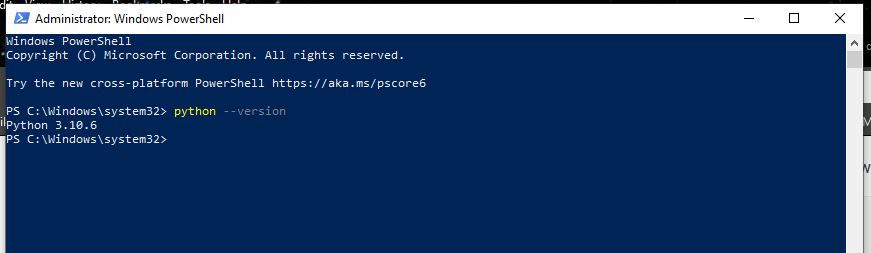
If you have anything other than 3.10.6, then it’s time to install the correct version.
Re-Installing Python
Before you install the correct version, I strongly recommend that you uninstall the incorrect Python from your computer first. To do this:
- Open “Add or Remove Programs”
- Search for your Python install in the app search box
- Select the incorrect version of Python and choose “uninstall”
- Now download V3.10.6 from the official Python site here:
https://www.python.org/downloads/release/python-3106/
The Windows installers are at the very bottom of the page; most modern computers will use the 64-bit version. If you don’t know what processor type you have, then do this real quick:
- Open Windows Explorer and click on the “This PC” icon in the left-hand navigation menu
- Right-click somewhere in the right-hand pane and select “Properties”
- A system info page will pop up; look under the “System” section, on the “System Type” line. It will say either “64-bit Operating System” or “32-Bit Operating System”.
- Run the install by double-clicking the file in your Windows Explorer
- Check the option box that says “Add Python 3.10.6 to Path”
- Click “Custom Installation”
- “Option Features” should all be check. If so, click on “Next”
- Check the option for “Install for all users” and click “Install”
- The installer will ask for permission to modify your system. Give it that permission.
- After the installation is done, open git bash (you should already have this program installed if you had Stable Diffusion installed before starting this)
- Enter the following command:
python -V- It should tell you the current version is “Python 3.10.6”
Now try re-opening Stable Diffusion and make a test image. If it’s still not working, go to Check #3.
Path Must Be Correct
Step 6 (Add to Path) in the instructions I just provided is important. If your installation of Stable Diffusion does not have the right Path, then it’s not going to find the Python interpreter and won’t run correctly (or at all).
3. Check Your File Directory
Auto1111’s web interface will not work properly if your file path has spaces in it. Look at the location where you have Stable Diffusion installed. The directory path may look something like:
C:\username\stable-diffusion-webuiNotice how the name of the Stable Diffusion folder has dashes between each word instead of spaces? Every folder in the path to your web UI must be free of any empty spaces. So if your installation path looks something like this:
C:\my AI art stuff\stable-diffusion-webuiThen you need to replace those spaces with dashes like so:
C:\my-AI-art-stuff\stable-diffusion-webuiIf you had to a folder name, then that was likely the cause of your black image output. Run Stable Diffusion again and do a test generation.
If it’s still not working, move on to Check #4.
4. Verify your Checkpoint File
You have a model loaded into Stable Diffusion, right? If you don’t have a checkpoint file in the correct subfolder of Stable Diffusion, it cannot generate images because it doesn’t have the training weights to do so. If you have a model, perhaps it was corrupted when downloaded.
Either way, I’ll show you how to check for models and switch between them, to see if the issue is being caused by one particular checkpoint file that isn’t working.
Check the Model Directory
In Windows Explorer, navigate to your Stable Diffusion interface folder, then to the folder named “models” and the subfolder named “Stable-diffusion”. It full file path may look like:
C:\username\stable-diffusion-webui\models\Stable-diffusionDouble check that you have at least one model file in this folder, either a CKPT or SafeTensors file. If this folder is empty, then download a model and place it inside this folder. Perhaps start with V1.5 Pruned in SafeTensors format available here.
Select a Model in the Web UI
Now open your Web interface again. Look in the top left corner at the drop-down box labeled as “Stable Diffusion checkpoint”. Do you see the name of the model you just downloaded?
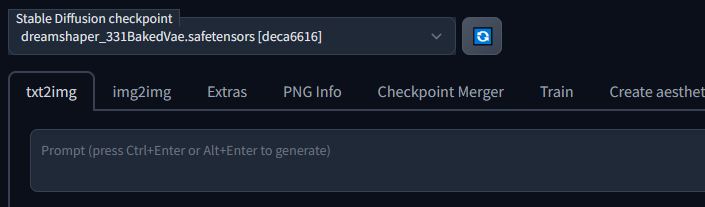
If not, then click on the drop down arrow and select your freshly-downloaded model. You should see the following lines in the black command terminal:
Loading weights from (and the name of your model file directory)
Applying cross attention optimization (Doggettx)
Model loaded.
Wait to run a test prompt until the “Model loaded” message has popped up. It could take a few minutes to load the model.
Please also note that V2.1 768 will not work on low-VRAM systems without having xformers (or a better GPU, unfortunately). If you’ve been trying to use V2.1 (the 768 version) this whole time, that is likely the culprit. Fall back to another version like V2.0 for GPUs running with less than 12GB of VRAM.
Are you still getting black output images? Then let’s move to Check #5.
5. Modify the Code for Low VRAM Usage
Stable Diffusion may not work properly if you don’t have enough VRAM on your graphics card to handle the generation process. You need at the bare minimum 4 GB of VRAM. If your GPU is a Nvidia 16xx series model (like a 1660), then that could be a big part of the issue due to lack of support for half precision float.
Remember that VRAM is different from regular RAM, it’s built into the GPU and you cannot allocate regular RAM in place of it. If you’re operating at 4GB, the issue may be caused by your system running out of memory while trying to process the image generation.
Furthermore, Stable Diffusion is not designed for working on AMD GPUs. There are workarounds on the internet, but your mileage will vary on their efficiency. I don’t have an AMD-equipped computer to test out, so I cannot help you if the issues are caused by an AMD graphics card.
Code for Reducing VRAM Usage
There is a line of code that you can modify to consume less VRAM during generation. It will take longer for images to process, but it should fix the black output error. Here’s how you edit the code for Stable Diffusion for this fix:
- Navigate to your Stable Diffusion installation folder in File Explorer
- Locate the webui.bat file (under “Type” in Explorer, it will says “Windows Batch File”)
- Open this file in a notepad editor. You can use plain notepad, but I recommend downloading Notepad++ from here and installing that. If you have Notepad++ installed, then right-click on the webui.bat file and choose the option that says “Edit with Notepad++”
- Enter a new blank line at the very top of the file, above @echo off (just click in front of the “@echo” and hit enter to move that line down)
- Add this code to that new blank line you just added:
COMMANDLINE_ARGS=--precision full –no-half –medvramNow test out your interface with another image generation. If you’re getting “CUDA Out of Memory” errors or a black output still, then trying changing that previous added line of code to:
COMMANDLINE_ARGS=--precision full –no-half –lowvramHardware Limitations
If you have tried all of the above fixes and you are still getting a black output image, then the issue may be a hardware limitation. Your GPU may simply be unable to handle the VRAM requirements for Stable Diffusion. In that case, you may need to either:
- Try using an online service that does not rely on your graphics card, or
- Upgrade to a more powerful GPU with more VRAM
I know that sucks, but Stable Diffusion is a GPU intensive program. If you plan to upgrade your graphics, be sure to get a Nvidia GPU because AMD GPUs are not officially supported.
Conclusion
I hope this guide helped you out, and I’m sorry if your output errors persist. If you’re now able to generate images, then you may find these other articles useful:

